
At Grand Vision Foundation (GVF) we are very proud of our Team Taiko community drumming program. Because of its high demand in the San Pedro community, many interested drummers have asked us how they can practice at home since the average person doesn’t own a Taiko drum. We created this post with that question in mind. That’s right – we’re gonna teach you how to make your own Taiko drum!
 In the same way that anyone can do Taiko drumming, anyone can also make their own practice drum to use in the comforts of their own home. Taiko rose to popularity in the U.S. during the social justice environmental movements of the ‘60s. This is why you might see many Taiko players using drums, and even bachi, Taiko drumsticks, made from reclaimed materials. It also goes along with the ethos of Taiko, having respect for one another and the environment. Read more about Taiko in the previous blog “Let’s Talk Taiko.”
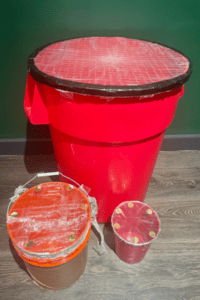
According to GVF Team Taiko Facilitator Connie McOsker, almost anything can be a practice drum: a tabletop, a pot turned upside down, or even a pillow if you don’t want to disturb the neighbors. To make one of the best homemade drums you’ll need a large garbage can or gomi-kan in Japanese (ゴミカン), an entire roll of Scotch brand packing tape and a bit of duct tape at the end. Scotch brand tape isn’t required however, our instructor, master Taiko drummer ManMan Mui says that it has the best quality.
This is a very easy process that should take about half an hour. Keep in mind that if you’re beating your drum nice and hard, the tape might rip, but that’s okay! It happens at Team Taiko too. All you have to do is put three tight layers of tape over the hole as a patch and you’re good to keep going.
Here is a step-by-step guide to making your very own Trash Can Taiko drum!
1. Tape around the rim of your garbage can with duct tape so that your packing tape has something to adhere securely to.
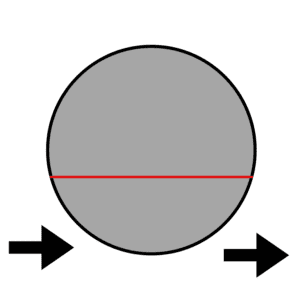
2. Pull out a strip of packing tape that can fit across the opening of your garbage can, leaving a few extra inches on both ends that can be taped to the rim for extra security.
3. Stretch the strip of tape out across the middle of the opening, making sure to pull it tight, but not TOO tight.

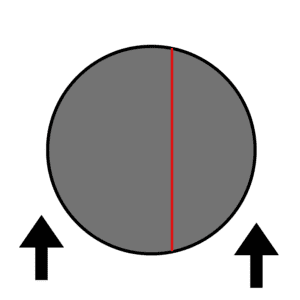
4. Pull out another strip of about the same length, and stretch this strip over the lid in the same way but in the opposite direction. The goal is to make the two strips of tape look like a cross or a plus sign.

5. Do the same thing with two more strips of tape, but go across the middle in diagonal directions. With all four strips of tape in place, it should look like a star.


6. Now that you have your tape star, pull out another strip of tape of the same length as the previous ones and just barely cross it in front of your first strip of tape.

7. Continue putting strips of tape across the middle of the garbage can opening, going in a clockwise direction until the entire opening is covered in tape.
8. For the second layer of tape, you’re going to layer the strips across the opening of your garbage can in horizontal rows until the entire first layer of tape is completely covered. Make sure that the tape covers half of the previous layer of tape.
9. Similarly, the third layer of tape will go in vertical rows until the second layer of tape is completely covered. Make sure that the tape covers half of the previous layer of tape.
10. Once you have three layers of tape, line the outside rim of the garbage can with duct tape to make sure the packing tape ends lie flat against the can.
11. When this step is complete, you can repeat steps 1-9 for a REALLY secure taiko drum skin, or leave it as is and start drumming away!
And there you have it! Your very own Taiko drum to practice with at home. Happy Drumming!